Hello everyone!
With new mobile OS versions releasing late this year, we recommend preparing your React Native apps beforehand to avoid regressions when the releases become generally available.

Hello everyone!
With new mobile OS versions releasing late this year, we recommend preparing your React Native apps beforehand to avoid regressions when the releases become generally available.
For a long time now, Apple has discouraged using UIWebViews in favor of WKWebView. In iOS 12, which will be released in the upcoming months, UIWebViews will be formally deprecated. React Native's iOS WebView implementation relies heavily on the UIWebView class. Therefore, in light of these developments, we've built a new native iOS backend to the WebView React Native component that uses WKWebView.
The tail end of these changes were landed in this commit, and will become available in the 0.57 release.
To opt into this new implementation, please use the useWebKit prop:
<WebView
  useWebKit={true}
  source={{ url: 'https://www.google.com' }}
/>
UIWebView had no legitimate way to facilitate communication between the JavaScript running in the WebView, and React Native. When messages were sent from the WebView, we relied on a hack to deliver them to React Native. Succinctly, we encoded the message data into a url with a special scheme, and navigated the WebView to it. On the native side, we intercepted and cancelled this navigation, parsed the data from the url, and finally called into React Native. This implementation was error prone and insecure. I'm glad to announce that we've leveraged WKWebView features to completely replace it.
Other benefits of WKWebView over UIWebView include faster JavaScript execution, and a multi-process architecture. Please see this 2014 WWDC for more details.
If your components use the following props, then you may experience problems when switching to WKWebView. For the time being, we suggest that you avoid using these props:
Inconsistent behavior:
automaticallyAdjustContentInsets and contentInsets (commit)
When you add contentInsets to a WKWebView, it doesn't change the WKWebView's viewport. The viewport remains the same size as the frame. With UIWebView, the viewport size actually changes (gets smaller, if the content insets are positive).
backgroundColor (commit)
With the new iOS implementation of WebView, there's a chance that your background color will flicker into view if you use this property. Furthermore, WKWebView renders transparent backgrounds differently from UIWebview. Please look at the commit description for more details.
Not supported:
scalesPageToFit (commit)
WKWebView didn't support the scalesPageToFit prop, so we couldn't implement this on the WebView React Native component.

As technology advances and mobile apps become increasingly important to everyday life, the necessity of creating accessible applications has likewise grown in importance.
React Native's limited Accessibility API has always been a huge pain point for developers, so we've made a few updates to the Accessibility API to make it easier to create inclusive mobile applications.
accessibilityComponentType and accessibilityTraits are two properties that are used to tell TalkBack on Android and VoiceOver on iOS what kind of UI element the user is interacting with. The two biggest problems with these properties are that:
accessibilityTraits on iOS allows 17 different values while accessibilityComponentType on Android allows only 4 values. Furthermore, the values for the most part had no overlap. Even the input types for these two properties are different. accessibilityTraits allows either an array of traits to be passed in or a single trait, while accessibilityComponentType allows only a single value.Accessibility Hints help users using TalkBack or VoiceOver understand what will happen when they perform an action on an accessibility element that is not apparent by only the accessibility label. These hints can be turned on and off in the settings panel. Previously, React Native's API did not support accessibility hints at all.
Some users with vision loss use inverted colors on their mobile phones to have greater screen contrast. Apple provided an API for iOS which allows developers to ignore certain views. This way, images and videos aren't distorted when a user has the inverted colors setting on. This API is currently unsupported by React Native.
In order to solve the confusion between accessibilityComponentType and accessibilityTraits, we decided to merge them into a single property. This made sense because they technically had the same intended functionality and by merging them, developers no longer had to worry about platform specific intricacies when building accessibility features.
Background
On iOS, UIAccessibilityTraits is a property that can be set on any NSObject. Each of the 17 traits passed in through the javascript property to native is mapped to a UIAccessibilityTraits element in Objective-C. Traits are each represented by a long int, and every trait that is set is ORed together.
On Android however, AccessibilityComponentType is a concept that was made up by React Native, and doesn't directly map to any properties in Android. Accessibility is handled by an accessibility delegate. Each view has a default accessibility delegate. If you want to customize any accessibility actions, you have to create a new accessibility delegate, override specific methods you want to customize, and then set the accessibility delegate of the view you are handling to be associated with the new delegate. When a developer set AccessibilityComponentType, the native code created a new delegate based off of the component that was passed in, and set the view to have that accessibility delegate.
Changes Made
For our new property, we wanted to create a superset of the two properties. We decided to keep the new property modeled mostly after the existing property accessibilityTraits, since accessibilityTraits has significantly more values. The functionality of Android for these traits would be polyfilled in by modifying the Accessibility Delegate.
There are 17 values of UIAccessibilityTraits that accessibilityTraits on iOS can be set to. However, we didn't include all of them as possible values to our new property. This is because the effect of setting some of these traits is actually not very well known, and many of these values are virtually never used.
The values UIAccessibilityTraits were set to generally took on one of two purposes. They either described a role that UI element had, or they described the state a UI element was in. Most uses of the previous properties we observed usually used one value that represented a role and combined it with either “state selected,” “state disabled,” or both. Therefore, we decided to create two new accessibility properties: accessibilityRole and accessibilityState.
accessibilityRole
The new property, accessibilityRole, is used to tell Talkback or Voiceover the role of a UI Element. This new property can take on one of the following values:
nonebuttonlinksearchimagekeyboardkeytextadjustableheadersummaryimagebuttonThis property only allows one value to be passed in because UI elements generally don't logically take on more than one of these. The exception is image and button, so we've added a role imagebutton that is a combination of both.
accessibilityStates
The new property, accessibilityStates, is used to tell Talkback or Voiceover the state a UI Element is in. This property takes on an Array containing one or both of the following values:
selecteddisabledFor this, we added a new property, accessibilityHint. Setting this property will allow Talkback or Voiceover to recite the hint to users.
accessibilityHint
This property takes in the accessibility hint to be read in the form of a String.
On iOS, setting this property will set the corresponding native property AccessibilityHint on the view. The hint will then be read by Voiceover if Accessibility Hints are turned on in the iPhone.
On Android, setting this property appends the value of the hint to the end of the accessibility label. The upside to this implementation is that it mimics the behavior of hints on iOS, but the downside to this implementation is that these hints cannot be turned off in the settings on Android the way they can be on iOS.
The reason we made this decision on Android is because normally, accessibility hints correspond with a specific action (e.g. click), and we wanted to keep behaviors consistent across platforms.
accessibilityIgnoresInvertColors
We exposed Apple's api AccessibilityIgnoresInvertColors to JavaScript, so now when you have a view where you don't want colors to be inverted (e.g image), you can set this property to true, and it won't be inverted.
These new properties will become available in the React Native 0.57 release.
If you are currently using accessibilityComponentType and accessibilityTraits, here are the steps you can take to upgrade to the new properties.
The most simple use cases can be replaced by running a jscodeshift script.
This script replaces the following instances:
accessibilityTraits=“trait”
accessibilityTraits={[“trait”]}
With
accessibilityRole= “trait”
This script also removes instances of AccessibilityComponentType (assuming everywhere you set AccessibilityComponentType, you would also set AccessibilityTraits).
For the cases that used AccessibilityTraits that don't have a corresponding value for AccessibilityRole, and the cases where multiple traits were passed into AccessibilityTraits, a manual codemod would have to be done.
In general,
accessibilityTraits= {[“button”, “selected”]}
would be manually replaced with
accessibilityRole=“button”
accessibilityStates={[“selected”]}
These properties are already being used in Facebook's codebase. The codemod for Facebook was surprisingly simple. The jscodeshift script fixed about half of our instances, and the other half was fixed manually. Overall, the entire process took less than a few hours.
Hopefully you will find the updated API useful! And please continue making apps accessible! #inclusion

It's been a while since we last published a status update about React Native.
At Facebook, we're using React Native more than ever and for many important projects. One of our most popular products is Marketplace, one of the top-level tabs in our app which is used by 800 million people each month. Since its creation in 2015, all of Marketplace has been built with React Native, including over a hundred full-screen views throughout different parts of the app.
We're also using React Native for many new parts of the app. If you watched the F8 keynote last month, you'll recognize Blood Donations, Crisis Response, Privacy Shortcuts, and Wellness Checks – all recent features built with React Native. And projects outside the main Facebook app are using React Native too. The new Oculus Go VR headset includes a companion mobile app that is fully built with React Native, not to mention React VR powering many experiences in the headset itself.
Naturally, we also use many other technologies to build our apps. Litho and ComponentKit are two libraries we use extensively in our apps; both provide a React-like component API for building native screens. It's never been a goal for React Native to replace all other technologies – we are focused on making React Native itself better, but we love seeing other teams borrow ideas from React Native, like bringing instant reload to non-JavaScript code too.
When we started the React Native project in 2013, we designed it to have a single “bridge” between JavaScript and native that is asynchronous, serializable, and batched. Just as React DOM turns React state updates into imperative, mutative calls to DOM APIs like document.createElement(attrs) and .appendChild(), React Native was designed to return a single JSON message that lists mutations to perform, like [["createView", attrs], ["manageChildren", ...]]. We designed the entire system to never rely on getting a synchronous response back and to ensure everything in that list could be fully serialized to JSON and back. We did this for the flexibility it gave us: on top of this architecture, we were able to build tools like Chrome debugging, which runs all the JavaScript code asynchronously over a WebSocket connection.
Over the last 5 years, we found that these initial principles have made building some features harder. An asynchronous bridge means you can't integrate JavaScript logic directly with many native APIs expecting synchronous answers. A batched bridge that queues native calls means it's harder to have React Native apps call into functions that are implemented natively. And a serializable bridge means unnecessary copying instead of directly sharing memory between the two worlds. For apps that are entirely built in React Native, these restrictions are usually bearable. But for apps with complex integration between React Native and existing app code, they are frustrating.
We're working on a large-scale rearchitecture of React Native to make the framework more flexible and integrate better with native infrastructure in hybrid JavaScript/native apps. With this project, we'll apply what we've learned over the last 5 years and incrementally bring our architecture to a more modern one. We're rewriting many of React Native's internals, but most of the changes are under the hood: existing React Native apps will continue to work with few or no changes.
To make React Native more lightweight and fit better into existing native apps, this rearchitecture has three major internal changes. First, we are changing the threading model. Instead of each UI update needing to perform work on three different threads, it will be possible to call synchronously into JavaScript on any thread for high-priority updates while still keeping low-priority work off the main thread to maintain responsiveness. Second, we are incorporating async rendering capabilities into React Native to allow multiple rendering priorities and to simplify asynchronous data handling. Finally, we are simplifying our bridge to make it faster and more lightweight; direct calls between native and JavaScript are more efficient and will make it easier to build debugging tools like cross-language stack traces.
Once these changes are completed, closer integrations will be possible. Today, it's not possible to incorporate native navigation and gesture handling or native components like UICollectionView and RecyclerView without complex hacks. After our changes to the threading model, building features like this will be straightforward.
We'll release more details about this work later this year as it approaches completion.
Alongside the community inside Facebook, we're happy to have a thriving population of React Native users and collaborators outside Facebook. We'd like to support the React Native community more, both by serving React Native users better and by making the project easier to contribute to.
Just as our architecture changes will help React Native interoperate more cleanly with other native infrastructure, React Native should be slimmer on the JavaScript side to fit better with the JavaScript ecosystem, which includes making the VM and bundler swappable. We know the pace of breaking changes can be hard to keep up with, so we'd like to find ways to have fewer major releases. Finally, we know that some teams are looking for more thorough documentation in topics like startup optimization, where our expertise hasn't yet been written down. Expect to see some of these changes over the coming year.
If you're using React Native, you're part of our community; keep letting us know how we can make React Native better for you.
React Native is just one tool in a mobile developer's toolbox, but it's one that we strongly believe in – and we're making it better every day, with over 2500 commits in the last year from 500+ contributors.

JavaScript! We all love it. But some of us also love types. Luckily, options exist to add stronger types to JavaScript. My favourite is TypeScript, but React Native supports Flow out of the box. Which you prefer is a matter of preference, they each have their own approach on how to add the magic of types to JavaScript. Today, we're going to look at how to use TypeScript in React Native apps.
This post uses Microsoft's TypeScript-React-Native-Starter repo as a guide.
Update: Since this blog post was written, things have gotten even easier. You can replace all the set up described in this blog post by running just one command:
npx react-native init MyAwesomeProject --template react-native-template-typescript
However, there are some limitations to Babel's TypeScript support, which the blog post above goes into in detail. The steps outlined in this post still work, and Artsy is still using react-native-typescript-transformer in production, but the fastest way to get up and running with React Native and TypeScript is using the above command. You can always switch later if you have to.
In any case, have fun! The original blog post continues below.
Because you might be developing on one of several different platforms, targeting several different types of devices, basic setup can be involved. You should first ensure that you can run a plain React Native app without TypeScript. Follow the instructions on the React Native website to get started. When you've managed to deploy to a device or emulator, you'll be ready to start a TypeScript React Native app.
You will also need Node.js, npm, and Yarn.
Once you've tried scaffolding out an ordinary React Native project, you'll be ready to start adding TypeScript. Let's go ahead and do that.
react-native init MyAwesomeProject
cd MyAwesomeProject
The next step is to add TypeScript to your project. The following commands will:
Okay, let's go ahead and run these.
yarn add --dev typescript
yarn add --dev react-native-typescript-transformer
yarn tsc --init --pretty --jsx react
touch rn-cli.config.js
yarn add --dev @types/react @types/react-native
The tsconfig.json file contains all the settings for the TypeScript compiler. The defaults created by the command above are mostly fine, but open the file and uncomment the following line:
{
  /* Search the config file for the following line and uncomment it. */
  // "allowSyntheticDefaultImports": true,  /* Allow default imports from modules with no default export. This does not affect code emit, just typechecking. */
}
The rn-cli.config.js contains the settings for the React Native TypeScript Transformer. Open it and add the following:
module.exports = {
  getTransformModulePath() {
    return require.resolve('react-native-typescript-transformer');
  },
  getSourceExts() {
    return ['ts', 'tsx'];
  }
};
Rename the generated App.js and __tests_/App.js files to App.tsx. index.js needs to use the .js extension. All new files should use the .tsx extension (or .ts if the file doesn't contain any JSX).
If you tried to run the app now, you'd get an error like object prototype may only be an object or null. This is caused by a failure to import the default export from React as well as a named export on the same line. Open App.tsx and modify the import at the top of the file:
-import React, { Component } from 'react';
+import React from 'react'
+import { Component } from 'react';
Some of this has to do with differences in how Babel and TypeScript interoperate with CommonJS modules. In the future, the two will stabilize on the same behaviour.
At this point, you should be able to run the React Native app.
React Native ships with Jest, so for testing a React Native app with TypeScript, we'll want to add ts-jest to our devDependencies.
yarn add --dev ts-jest
Then, we'll open up our package.json and replace the jest field with the following:
{
  "jest": {
    "preset": "react-native",
    "moduleFileExtensions": [
      "ts",
      "tsx",
      "js"
    ],
    "transform": {
      "^.+\\.(js)$": "<rootDir>/node_modules/babel-jest",
      "\\.(ts|tsx)$": "<rootDir>/node_modules/ts-jest/preprocessor.js"
    },
    "testRegex": "(/__tests__/.*|\\.(test|spec))\\.(ts|tsx|js)$",
    "testPathIgnorePatterns": [
      "\\.snap$",
      "<rootDir>/node_modules/"
    ],
    "cacheDirectory": ".jest/cache"
  }
}
This will configure Jest to run .ts and .tsx files with ts-jest.
To get the best experience in TypeScript, we want the type-checker to understand the shape and API of our dependencies. Some libraries will publish their packages with .d.ts files (type declaration/type definition files), which can describe the shape of the underlying JavaScript. For other libraries, we'll need to explicitly install the appropriate package in the @types/ npm scope.
For example, here we'll need types for Jest, React, and React Native, and React Test Renderer.
yarn add --dev @types/jest @types/react @types/react-native @types/react-test-renderer
We saved these declaration file packages to our dev dependencies because this is a React Native app that only uses these dependencies during development and not during runtime. If we were publishing a library to NPM, we might have to add some of these type dependencies as regular dependencies.
You can read more here about getting .d.ts files.
For your source control, you'll want to start ignoring the .jest folder. If you're using git, we can just add entries to our .gitignore file.
# Jest
#
.jest/
As a checkpoint, consider committing your files into version control.
git init
git add .gitignore # import to do this first, to ignore our files
git add .
git commit -am "Initial commit."
Let's add a component to our app. Let's go ahead and create a Hello.tsx component. It's a pedagogical component, not something that you'd actually write in an app, but something nontrivial that shows off how to use TypeScript in React Native.
Create a components directory and add the following example.
// components/Hello.tsx
import React from 'react';
import { Button, StyleSheet, Text, View } from 'react-native';

export interface Props {
  name: string;
  enthusiasmLevel?: number;
}

interface State {
  enthusiasmLevel: number;
}

export class Hello extends React.Component<Props, State> {
  constructor(props: Props) {
    super(props);

    if ((props.enthusiasmLevel || 0) <= 0) {
      throw new Error(
        'You could be a little more enthusiastic. :D'
      );
    }

    this.state = {
      enthusiasmLevel: props.enthusiasmLevel || 1
    };
  }

  onIncrement = () =>
    this.setState({
      enthusiasmLevel: this.state.enthusiasmLevel + 1
    });
  onDecrement = () =>
    this.setState({
      enthusiasmLevel: this.state.enthusiasmLevel - 1
    });
  getExclamationMarks = (numChars: number) =>
    Array(numChars + 1).join('!');

  render() {
    return (
      <View style={styles.root}>
        <Text style={styles.greeting}>
          Hello{' '}
          {this.props.name +
            this.getExclamationMarks(this.state.enthusiasmLevel)}
        </Text>

        <View style={styles.buttons}>
          <View style={styles.button}>
            <Button
              title="-"
              onPress={this.onDecrement}
              accessibilityLabel="decrement"
              color="red"
            />
          </View>

          <View style={styles.button}>
            <Button
              title="+"
              onPress={this.onIncrement}
              accessibilityLabel="increment"
              color="blue"
            />
          </View>
        </View>
      </View>
    );
  }
}

// styles
const styles = StyleSheet.create({
  root: {
    alignItems: 'center',
    alignSelf: 'center'
  },
  buttons: {
    flexDirection: 'row',
    minHeight: 70,
    alignItems: 'stretch',
    alignSelf: 'center',
    borderWidth: 5
  },
  button: {
    flex: 1,
    paddingVertical: 0
  },
  greeting: {
    color: '#999',
    fontWeight: 'bold'
  }
});
Whoa! That's a lot, but let's break it down:
div, span, h1, etc., we're rendering components like View and Button. These are native components that work across different platforms.StyleSheet.create function that React Native gives us. React's stylesheets allow us to control our layout using Flexbox, and style using other constructs similar to those in CSS.Now that we've got a component, let's try testing it.
We already have Jest installed as a test runner. We're going to write snapshot tests for our components, let's add the required add-on for snapshot tests:
yarn add --dev react-addons-test-utils
Now let's create a __tests__ folder in the components directory and add a test for Hello.tsx:
// components/__tests__/Hello.tsx
import React from 'react';
import renderer from 'react-test-renderer';

import { Hello } from '../Hello';

it('renders correctly with defaults', () => {
  const button = renderer
    .create(<Hello name="World" enthusiasmLevel={1} />)
    .toJSON();
  expect(button).toMatchSnapshot();
});
The first time the test is run, it will create a snapshot of the rendered component and store it in the components/__tests__/__snapshots__/Hello.tsx.snap file. When you modify your component, you'll need to update the snapshots and review the update for inadvertent changes. You can read more about testing React Native components here.
Check out the official React tutorial and state-management library Redux. These resources can be helpful when writing React Native apps. Additionally, you may want to look at ReactXP, a component library written entirely in TypeScript that supports both React on the web as well as React Native.
Have fun in a more type-safe React Native development environment!

Three years ago, a GitHub issue was opened to support input accessory view from React Native.
In the ensuing years, there have been countless '+1s', various workarounds, and zero concrete changes to RN on this issue - until today. Starting with iOS, we're exposing an API for accessing the native input accessory view and we are excited to share how we built it.
What exactly is an input accessory view? Reading Apple's developer documentation, we learn that it's a custom view which can be anchored to the top of the system keyboard whenever a receiver becomes the first responder. Anything that inherits from UIResponder can redeclare the .inputAccessoryView property as read-write, and manage a custom view here. The responder infrastructure mounts the view, and keeps it in sync with the system keyboard. Gestures which dismiss the keyboard, like a drag or tap, are applied to the input accessory view at the framework level. This allows us to build content with interactive keyboard dismissal, an integral feature in top-tier messaging apps like iMessage and WhatsApp.
There are two common use cases for anchoring a view to the top of the keyboard. The first is creating a keyboard toolbar, like the Facebook composer background picker.
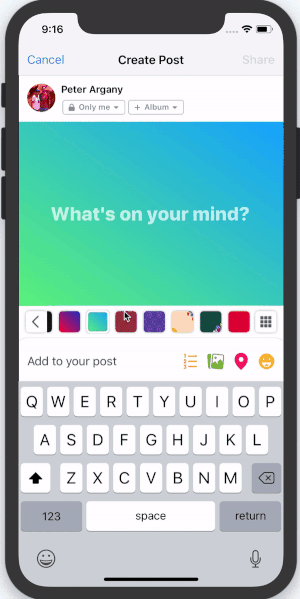
In this scenario, the keyboard is focused on a text input field, and the input accessory view is used to provide additional keyboard functionality. This functionality is contextual to the type of input field. In a mapping application it could be address suggestions, or in a text editor, it could be rich text formatting tools.
The Objective-C UIResponder who owns the <InputAccessoryView> in this scenario should be clear. The <TextInput> has become first responder, and under the hood this becomes an instance of UITextView or UITextField.
The second common scenario is sticky text inputs:
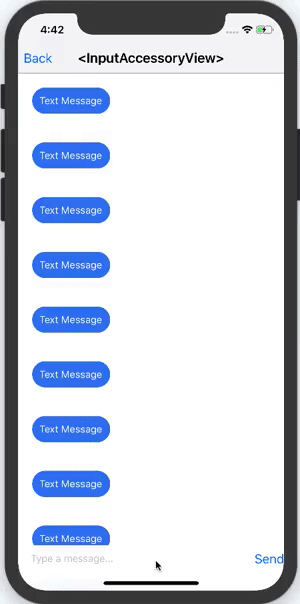
Here, the text input is actually part of the input accessory view itself. This is commonly used in messaging applications, where a message can be composed while scrolling through a thread of previous messages.
Who owns the <InputAccessoryView> in this example? Can it be the UITextView or UITextField again? The text input is inside the input accessory view, this sounds like a circular dependency. Solving this issue alone is another blog post in itself. Spoilers: the owner is a generic UIView subclass who we manually tell to becomeFirstResponder.
We now know what an <InputAccessoryView> is, and how we want to use it. The next step is designing an API that makes sense for both use cases, and works well with existing React Native components like <TextInput>.
For keyboard toolbars, there are a few things we want to consider:
<InputAccessoryView>.<InputAccessoryView> to a particular <TextInput>.<InputAccessoryView> across multiple text inputs, without duplicating any code.We can achieve #1 using a concept similar to React portals. In this design, we portal React Native views to a UIView hierarchy managed by the responder infrastructure. Since React Native views render as UIViews, this is actually quite straightforward - we can just override:
- (void)insertReactSubview:(UIView *)subview atIndex:(NSInteger)atIndex
and pipe all the subviews to a new UIView hierarchy. For #2, we set up a new RCTTouchHandler for the <InputAccessoryView>. State updates are achieved by using regular event callbacks. For #3 and #4, we use the nativeID field to locate the accessory view UIView hierarchy in native code during the creation of a <TextInput> component. This function uses the .inputAccessoryView property of the underlying native text input. Doing this effectively links <InputAccessoryView> to <TextInput> in their ObjC implementations.
Supporting sticky text inputs (scenario 2) adds a few more constraints. For this design, the input accessory view has a text input as a child, so linking via nativeID is not an option. Instead, we set the .inputAccessoryView of a generic off-screen UIView to our native <InputAccessoryView> hierarchy. By manually telling this generic UIView to become first responder, the hierarchy is mounted by responder infrastructure. This concept is explained thoroughly in the aforementioned blog post.
Of course not everything was smooth sailing while building this API. Here are a few pitfalls we encountered, along with how we fixed them.
An initial idea for building this API involved listening to NSNotificationCenter for UIKeyboardWill(Show/Hide/ChangeFrame) events. This pattern is used in some open-sourced libraries, and internally in some parts of the Facebook app. Unfortunately, UIKeyboardDidChangeFrame events were not being called in time to update the <InputAccessoryView> frame on swipes. Also, changes in keyboard height are not captured by these events. This creates a class of bugs that manifest like this:

On iPhone X, text and emoji keyboard are different heights. Most applications using keyboard events to manipulate text input frames had to fix the above bug. Our solution was to commit to using the .inputAccessoryView property, which meant that the responder infrastructure handles frame updates like this.
Another tricky bug we encountered was avoiding the home pill on iPhone X. You may be thinking, “Apple developed safeAreaLayoutGuide for this very reason, this is trivial!”. We were just as naive. The first issue is that the native <InputAccessoryView> implementation has no window to anchor to until the moment it is about to appear. That's alright, we can override -(BOOL)becomeFirstResponder and enforce layout constraints there. Adhering to these constraints bumps the accessory view up, but another bug arises: 
The input accessory view successfully avoids the home pill, but now content behind the unsafe area is visible. The solution lies in this radar. I wrapped the native <InputAccessoryView> hierarchy in a container which doesn't conform to the safeAreaLayoutGuide constraints. The native container covers the content in the unsafe area, while the <InputAccessoryView> stays within the safe area boundaries.
Here's an example which builds a keyboard toolbar button to reset <TextInput> state.
class TextInputAccessoryViewExample extends React.Component<
  {},
  *
> {
  constructor(props) {
    super(props);
    this.state = { text: 'Placeholder Text' };
  }

  render() {
    const inputAccessoryViewID = 'inputAccessoryView1';
    return (
      <View>
        <TextInput
          style={styles.default}
          inputAccessoryViewID={inputAccessoryViewID}
          onChangeText={(text) => this.setState({ text })}
          value={this.state.text}
        />
        <InputAccessoryView nativeID={inputAccessoryViewID}>
          <View style={{ backgroundColor: 'white' }}>
            <Button
              onPress={() =>
                this.setState({ text: 'Placeholder Text' })
              }
              title="Reset Text"
            />
          </View>
        </InputAccessoryView>
      </View>
    );
  }
}
Another example for Sticky Text Inputs can be found in the repository.
The full commit for this feature implementation is here. <InputAccessoryView> will be available in the upcoming v0.55.0 release.
Happy keyboarding :)

AWS is well known in the technology industry as a provider of cloud services. These include compute, storage, and database technologies, as well as fully managed serverless offerings. The AWS Mobile team has been working closely with customers and members of the JavaScript ecosystem to make cloud-connected mobile and web applications more secure, scalable, and easier to develop and deploy. We began with a complete starter kit, but have a few more recent developments.
This blog post talks about some interesting things for React and React Native developers:
React Native applications are very easy to bootstrap using tools like Create React Native App and Expo. However, connecting them to the cloud can be challenging to navigate when you try to match a use case to infrastructure services. For example, your React Native app might need to upload photos. Should these be protected per user? That probably means you need some sort of registration or sign-in process. Do you want your own user directory or are you using a social media provider? Maybe your app also needs to call an API with custom business logic after users log in.
To help JavaScript developers with these problems, we released a library named AWS Amplify. The design is broken into "categories" of tasks, instead of AWS-specific implementations. For example, if you wanted users to register, log in, and then upload private photos, you would simply pull in Auth and Storage categories to your application:
import { Auth } from 'aws-amplify';

Auth.signIn(username, password)
    .then(user => console.log(user))
    .catch(err => console.log(err));

Auth.confirmSignIn(user, code)
    .then(data => console.log(data))
    .catch(err => console.log(err));
In the code above, you can see an example of some of the common tasks that Amplify helps you with, such as using multi-factor authentication (MFA) codes with either email or SMS. The supported categories today are:
One of the nice things about Amplify is that it encodes "best practices" in the design for your specific programming environment. For example, one thing we found working with customers and React Native developers is that shortcuts taken during development to get things working quickly would make it through to production stacks. These can compromise either scalability or security, and force infrastructure rearchitecture and code refactoring.
One example of how we help developers avoid this is the Serverless Reference Architectures with AWS Lambda. These show you best practices around using Amazon API Gateway and AWS Lambda together when building your backend. This pattern is encoded into the API category of Amplify. You can use this pattern to interact with several different REST endpoints, and pass headers all the way through to your Lambda function for custom business logic. We’ve also released an AWS Mobile CLI for bootstrapping new or existing React Native projects with these features. To get started, just install via npm, and follow the configuration prompts:
npm install --global awsmobile-cli
awsmobile configure
Another example of encoded best practices that is specific to the mobile ecosystem is password security. The default Auth category implementation leverages Amazon Cognito user pools for user registration and sign-in. This service implements Secure Remote Password protocol as a way of protecting users during authentication attempts. If you're inclined to read through the mathematics of the protocol, you'll notice that you must use a large prime number when calculating the password verifier over a primitive root to generate a Group. In React Native environments, JIT is disabled. This makes BigInteger calculations for security operations such as this less performant. To account for this, we've released native bridges in Android and iOS that you can link inside your project:
npm install --save aws-amplify-react-native
react-native link amazon-cognito-identity-js
We're also excited to see that the Expo team has included this in their latest SDK so that you can use Amplify without ejecting.
Finally, specific to React Native (and React) development, Amplify contains higher order components (HOCs) for easily wrapping functionality, such as for sign-up and sign-in to your app:
import Amplify, { withAuthenticator } from 'aws-amplify-react-native';
import aws_exports from './aws-exports';

Amplify.configure(aws_exports);

class App extends React.Component {
...
}

export default withAuthenticator(App);
The underlying component is also provided as <Authenticator />, which gives you full control to customize the UI. It also gives you some properties around managing the state of the user, such as if they've signed in or are waiting for MFA confirmation, and callbacks that you can fire when state changes.
Similarly, you'll find general React components that you can use for different use cases. You can customize these to your needs, for example, to show all private images from Amazon S3 in the Storage module:
<S3Album
  level="private"
  path={path}
  filter={(item) => /jpg/i.test(item.path)}/>
You can control many of the component features via props, as shown earlier, with public or private storage options. There are even capabilities to automatically gather analytics when users interact with certain UI components:
return <S3Album track/>
AWS Amplify favors a convention over configuration style of development, with a global initialization routine or initialization at the category level. The quickest way to get started is with an aws-exports file. However, developers can also use the library independently with existing resources.
For a deep dive into the philosophy and to see a full demo, check out the video from AWS re:Invent.
Shortly after the launch of AWS Amplify, we also released AWS AppSync. This is a fully managed GraphQL service that has both offline and real-time capabilities. Although you can use GraphQL in different client programming languages (including native Android and iOS), it's quite popular among React Native developers. This is because the data model fits nicely into a unidirectional data flow and component hierarchy.
AWS AppSync enables you to connect to resources in your own AWS account, meaning you own and control your data. This is done by using data sources, and the service supports Amazon DynamoDB, Amazon Elasticsearch, and AWS Lambda. This enables you to combine functionality (such as NoSQL and full-text search) in a single GraphQL API as a schema. This enables you to mix and match data sources. The AppSync service can also provision from a schema, so if you aren't familiar with AWS services, you can write GraphQL SDL, click a button, and you're automatically up and running.
The real-time functionality in AWS AppSync is controlled via GraphQL subscriptions with a well-known, event-based pattern. Because subscriptions in AWS AppSync are controlled on the schema with a GraphQL directive, and a schema can use any data source, this means you can trigger notifications from database operations with Amazon DynamoDB and Amazon Elasticsearch Service, or from other parts of your infrastructure with AWS Lambda.
In a way similar to AWS Amplify, you can use enterprise security features on your GraphQL API with AWS AppSync. The service lets you get started quickly with API keys. However, as you roll to production it can transition to using AWS Identity and Access Management (IAM) or OIDC tokens from Amazon Cognito user pools. You can control access at the resolver level with policies on types. You can even use logical checks for fine-grained access control checks at run time, such as detecting if a user is the owner of a specific database resource. There are also capabilities around checking group membership for executing resolvers or individual database record access.
To help React Native developers learn more about these technologies, there is a built-in GraphQL sample schema that you can launch on the AWS AppSync console homepage. This sample deploys a GraphQL schema, provisions database tables, and connects queries, mutations, and subscriptions automatically for you. There is also a functioning React Native example for AWS AppSync which leverages this built in schema (as well as a React example), which enable you to get both your client and cloud components running in minutes.
Getting started is simple when you use the AWSAppSyncClient, which plugs in to the Apollo Client. The AWSAppSyncClient handles security and signing for your GraphQL API, offline functionality, and the subscription handshake and negotiation process:
import AWSAppSyncClient from "aws-appsync";
import { Rehydrated } from 'aws-appsync-react';
import { AUTH_TYPE } from "aws-appsync/lib/link/auth-link";

const client = new AWSAppSyncClient({
  url: awsconfig.graphqlEndpoint,
  region: awsconfig.region,
  auth: {type: AUTH_TYPE.API_KEY, apiKey: awsconfig.apiKey}
});
The AppSync console provides a configuration file for download, which contains your GraphQL endpoint, AWS Region, and API key. You can then use the client with React Apollo:
const WithProvider = () => (
  <ApolloProvider client={client}>
      <Rehydrated>
          <App />
      </Rehydrated>
  </ApolloProvider>
);
At this point, you can use standard GraphQL queries:
query ListEvents {
    listEvents{
      items{
        __typename
        id
        name
        where
        when
        description
        comments{
          __typename
          items{
            __typename
            eventId
            commentId
            content
            createdAt
          }
          nextToken
        }
      }
    }
}
The example above shows a query with the sample app schema provisioned by AppSync. It not only showcases interaction with DynamoDB, but also includes pagination of data (including encrypted tokens) and type relations between Events and Comments. Because the app is configured with the AWSAppSyncClient, data is automatically persisted offline and will synchronize when devices reconnect.
You can see a deep dive of the client technology behind this and a React Native demo in this video.
The team behind the libraries is eager to hear how these libraries and services work for you. They also want to hear what else we can do to make React and React Native development with cloud services easier for you. Reach out to the AWS Mobile team on GitHub for AWS Amplify or AWS AppSync.

Twitter’s iOS app has a loading animation I quite enjoy.

Once the app is ready, the Twitter logo delightfully expands, revealing the app.
I wanted to figure out how to recreate this loading animation with React Native.
To understand how to build it, I first had to understand the difference pieces of the loading animation. The easiest way to see the subtlety is to slow it down.

There are a few major pieces in this that we will need to figure out how to build.
It took me quite a while to figure out how to make this animation.
I started with an incorrect assumption that the blue background and Twitter bird were a layer on top of the app and that as the bird grew, it became transparent which revealed the app underneath. This approach doesn’t work because the Twitter bird becoming transparent would show the blue layer, not the app underneath!
Luckily for you, dear reader, you don’t have to go through the same frustration I did. You get this nice tutorial skipping to the good stuff!
Before we get to code, it is important to understand how to break this down. To help visualize this effect, I recreated it in CodePen (embedded in a few paragraphs) so you can interactively see the different layers.

There are three main layers to this effect. The first is the blue background layer. Even though this seems to appear on top of the app, it is actually in the back.
We then have a plain white layer. And then lastly, in the very front, is our app.
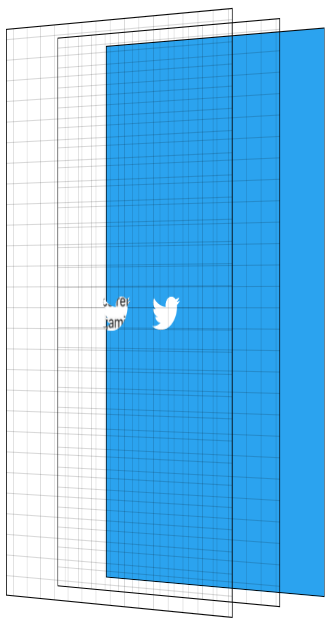
The main trick to this animation is using the Twitter logo as a mask and masking both the app, and the white layer. I won’t go too deep on the details of masking, there are plenty of resources online for that.
The basics of masking in this context are having images where opaque pixels of the mask show the content they are masking whereas transparent pixels of the mask hide the content they are masking.
We use the Twitter logo as a mask, and having it mask two layers; the solid white layer, and the app layer.
To reveal the app, we scale the mask up until it is larger than the entire screen.
While the mask is scaling up, we fade in the opacity of the app layer, showing the app and hiding the solid white layer behind it. To finish the effect, we start the app layer at a scale > 1, and scale it down to 1 as the animation is ending. We then hide the non-app layers as they will never be seen again.
They say a picture is worth 1,000 words. How many words is an interactive visualization worth? Click through the animation with the “Next Step” button. Showing the layers gives you a side view perspective. The grid is there to help visualize the transparent layers.
Alrighty. Now that we know what we are building and how the animation works, we can get down to the code — the reason you are really here.
The main piece of this puzzle is MaskedViewIOS, a core React Native component.
import { MaskedViewIOS } from 'react-native';

<MaskedViewIOS maskElement={<Text>Basic Mask</Text>}>
  <View style={{ backgroundColor: 'blue' }} />
</MaskedViewIOS>;
MaskedViewIOS takes props maskElement and children. The children are masked by the maskElement. Note that the mask doesn’t need to be an image, it can be any arbitrary view. The behavior of the above example would be to render the blue view, but for it to be visible only where the words “Basic Mask” are from the maskElement. We just made complicated blue text.
What we want to do is render our blue layer, and then on top render our masked app and white layers with the Twitter logo.
{
  fullScreenBlueLayer;
}
<MaskedViewIOS
  style={{ flex: 1 }}
  maskElement={
    <View style={styles.centeredFullScreen}>
      <Image source={twitterLogo} />
    </View>
  }>
  {fullScreenWhiteLayer}
  <View style={{ flex: 1 }}>
    <MyApp />
  </View>
</MaskedViewIOS>;
This will give us the layers we see below.
We have all the pieces we need to make this work, the next step is animating them. To make this animation feel good, we will be utilizing React Native’s Animated API.
Animated lets us define our animations declaratively in JavaScript. By default, these animations run in JavaScript and tell the native layer what changes to make on every frame. Even though JavaScript will try to update the animation every frame, it will likely not be able to do that fast enough and will cause dropped frames (jank) to occur. Not what we want!
Animated has special behavior to allow you to get animations without this jank. Animated has a flag called useNativeDriver which sends your animation definition from JavaScript to native at the beginning of your animation, allowing the native side to process the updates to your animation without having to go back and forth to JavaScript every frame. The downside of useNativeDriver is you can only update a specific set of properties, mostly transform and opacity. You can’t animate things like background color with useNativeDriver, at least not yet — we will add more over time, and of course you can always submit a PR for properties you need for your project, benefitting the whole community 😀.
Since we want this animation to be smooth, we will work within these constraints. For a more in depth look at how useNativeDriver works under the hood, check out our blog post announcing it.
There are 4 components to our animation:
With Animated, there are two main ways to define your animation. The first is by using Animated.timing which lets you say exactly how long your animation will run for, along with an easing curve to smooth out the motion. The other approach is by using the physics based apis such as Animated.spring. With Animated.spring, you specify parameters like the amount of friction and tension in the spring, and let physics run your animation.
We have multiple animations we want to be running at the same time which are all closely related to each other. For example, we want the app to start fading in while the mask is mid-reveal. Because these animations are closely related, we will use Animated.timing with a single Animated.Value.
Animated.Value is a wrapper around a native value that Animated uses to know the state of an animation. You typically want to only have one of these for a complete animation. Most components that use Animated will store the value in state.
Since I’m thinking about this animation as steps occurring at different points in time along the complete animation, we will start our Animated.Value at 0, representing 0% complete, and end our value at 100, representing 100% complete.
Our initial component state will be the following.
state = {
  loadingProgress: new Animated.Value(0)
};
When we are ready to begin the animation, we tell Animated to animate this value to 100.
Animated.timing(this.state.loadingProgress, {
  toValue: 100,
  duration: 1000,
  useNativeDriver: true // This is important!
}).start();
I then try to figure out a rough estimate of the different pieces of the animations and the values I want them to have at different stages of the overall animation. Below is a table of the different pieces of the animation, and what I think their values should be at different points as we progress through time.

The Twitter bird mask should start at scale 1, and it gets smaller before it shoots up in size. So at 10% through the animation, it should have a scale value of .8 before shooting up to scale 70 at the end. Picking 70 was pretty arbitrary to be honest, it needed to be large enough that the bird fully revealed the screen and 60 wasn’t big enough 😀. Something interesting about this part though is that the higher the number, the faster it will look like it is growing because it has to get there in the same amount of time. This number took some trial and error to make look good with this logo. Logos / devices of different sizes will require this end-scale to be different to ensure the entire screen is revealed.
The app should stay opaque for a while, at least through the Twitter logo getting smaller. Based on the official animation, I want to start showing it when the bird is mid way through scaling it up and to fully reveal it pretty quickly. So at 15% we start showing it, and at 30% through the overall animation it is fully visible.
The app scale starts at 1.1 and scales down to its regular scale by the end of the animation.
What we essentially did above is map the values from the animation progress percentage to the values for the individual pieces. We do that with Animated using .interpolate. We create 3 different style objects, one for each piece of the animation, using interpolated values based off of this.state.loadingProgress.
const loadingProgress = this.state.loadingProgress;

const opacityClearToVisible = {
  opacity: loadingProgress.interpolate({
    inputRange: [0, 15, 30],
    outputRange: [0, 0, 1],
    extrapolate: 'clamp'
    // clamp means when the input is 30-100, output should stay at 1
  })
};

const imageScale = {
  transform: [
    {
      scale: loadingProgress.interpolate({
        inputRange: [0, 10, 100],
        outputRange: [1, 0.8, 70]
      })
    }
  ]
};

const appScale = {
  transform: [
    {
      scale: loadingProgress.interpolate({
        inputRange: [0, 100],
        outputRange: [1.1, 1]
      })
    }
  ]
};
Now that we have these style objects, we can use them when rendering the snippet of the view from earlier in the post. Note that only Animated.View, Animated.Text, and Animated.Image are able to use style objects that use Animated.Value.
const fullScreenBlueLayer = (
  <View style={styles.fullScreenBlueLayer} />
);
const fullScreenWhiteLayer = (
  <View style={styles.fullScreenWhiteLayer} />
);

return (
  <View style={styles.fullScreen}>
    {fullScreenBlueLayer}
    <MaskedViewIOS
      style={{ flex: 1 }}
      maskElement={
        <View style={styles.centeredFullScreen}>
          <Animated.Image
            style={[styles.maskImageStyle, imageScale]}
            source={twitterLogo}
          />
        </View>
      }>
      {fullScreenWhiteLayer}
      <Animated.View
        style={[opacityClearToVisible, appScale, { flex: 1 }]}>
        {this.props.children}
      </Animated.View>
    </MaskedViewIOS>
  </View>
);

Yay! We now have the animation pieces looking like we want. Now we just have to clean up our blue and white layers which will never be seen again.
To know when we can clean them up, we need to know when the animation is complete. Luckily where we call, Animated.timing ,.start takes an optional callback that runs when the animation is complete.
Animated.timing(this.state.loadingProgress, {
  toValue: 100,
  duration: 1000,
  useNativeDriver: true
}).start(() => {
  this.setState({
    animationDone: true
  });
});
Now that we have a value in state to know whether we are done with the animation, we can modify our blue and white layers to use that.
const fullScreenBlueLayer = this.state.animationDone ? null : (
  <View style={[styles.fullScreenBlueLayer]} />
);
const fullScreenWhiteLayer = this.state.animationDone ? null : (
  <View style={[styles.fullScreenWhiteLayer]} />
);
Voila! Our animation now works and we clean up our unused layers once the animation is done. We have built the Twitter app loading animation!
Don’t fret, dear reader. I too hate when guides only give you chunks of the code and don’t give you the completed source.
This component has been published to npm and is on GitHub as react-native-mask-loader. To try this out on your phone, it is available on Expo here:


The React Native monthly meeting is still going strong! Make sure to check a note on the bottom of this post for the next sessions.
react-native-gesture-handler and we’re really excited about some of the improvements we have planned. If you're looking to contribute to the community, check out react-native-maps and react-native-svg, which could both use some help!There's been some discussion on re-purposing this meeting to discuss a single and specific topic (e.g. navigation, moving React Native modules into separate repos, documentation, ...). That way we feel we can contribute the best to React Native community. It might take place in the next meeting session. Feel free to tweet what you'd like to see covered as a topic.
The React Native monthly meeting continues! Let's see what our teams are up to.
I18nManager.swapLeftAndRightInRTL(false) in your React Native components to opt into them.The next session is scheduled for Wednesday 6, December 2017. Feel free to ping me on Twitter if you have any suggestion on how we should improve the output of the meeting.

The React Native monthly meeting continues! Here are the notes from each team:
Trying to lower the entry barrier for the developers embracing React Native with the following things:
react-native-gesture-handler, and improved error handling.<Text> and <TextInput> components on Android. (Native auto-growing for <TextInput>; deeply nested <Text> components layout issues; better code structure; performance optimizations).The next session is scheduled for Wednesday 10, October 2017. As this was only our fourth meeting, we'd like to know how do these notes benefit the React Native community. Feel free to ping me on Twitter if you have any suggestion on how we should improve the output of the meeting.
The React Native monthly meeting continues! This month's meeting was a bit shorter as most of our teams were busy shipping. Next month, we are at React Native EU conference in Wroclaw, Poland. Make sure to grab a ticket and see you there in person! Meanwhile, let's see what our teams are up to.
On this third meeting, we had 5 teams join us:
Here are the notes from each team:
react-native-material-palette. It extracts prominent colors from images to help you create visually engaging apps. It's Android only at the moment, but we are looking into adding support for iOS in the future.haul and a bunch of other, cool stuff! Check out latest releases.The next session is scheduled for Wednesday 13, September 2017. As this was only our third meeting, we'd like to know how do these notes benefit the React Native community. Feel free to ping me on Twitter if you have any suggestion on how we should improve the output of the meeting.
React Native is used in multiple places across multiple apps in the Facebook family including a top level tab in the main Facebook apps. Our focus for this post is a highly visible product, Marketplace. It is available in a dozen or so countries and enables users to discover products and services provided by other users.
In the first half of 2017, through the joint effort of the Relay Team, the Marketplace team, the Mobile JS Platform team, and the React Native team, we cut Marketplace Time to Interaction (TTI) in half for Android Year Class 2010-11 devices. Facebook has historically considered these devices as low-end Android devices, and they have the slowest TTIs on any platform or device type.
A typical React Native startup looks something like this:

Disclaimer: ratios aren't representative and will vary depending on how React Native is configured and used.
We first initialize the React Native core (aka the “Bridge”) before running the product specific JavaScript which determines what native views React Native will render in the Native Processing Time.
One of the earlier mistakes that we made was to let Systrace and CTScan drive our performance efforts. These tools helped us find a lot of low-hanging fruit in 2016, but we discovered that both Systrace and CTScan are not representative of production scenarios and cannot emulate what happens in the wild. Ratios of time spent in the breakdowns are often incorrect and, wildly off-base at times. At the extreme, some things that we expected to take a few milliseconds actually take hundreds or thousands of milliseconds. That said, CTScan is useful and we've found it catches a third of regressions before they hit production.
On Android, we attribute the shortcomings of these tools to the fact that 1) React Native is a multithreaded framework, 2) Marketplace is co-located with a multitude of complex views such as Newsfeed and other top-level tabs, and 3) computation times vary wildly. Thus, this half, we let production measurements and breakdowns drive almost all of our decision making and prioritization.
Instrumenting production may sound simple on the surface, but it turned out to be quite a complex process. It took multiple iteration cycles of 2-3 weeks each; due to the latency of landing a commit in master, to pushing the app to the Play Store, to gathering sufficient production samples to have confidence in our work. Each iteration cycle involved discovering if our breakdowns were accurate, if they had the right level of granularity, and if they properly added up to the whole time span. We could not rely on alpha and beta releases because they are not representative of the general population. In essence, we very tediously built a very accurate production trace based on the aggregate of millions of samples.
One of the reasons we meticulously verified that every millisecond in breakdowns properly added up to their parent metrics was that we realized early on there were gaps in our instrumentation. It turned out that our initial breakdowns did not account for stalls caused by thread jumps. Thread jumps themselves aren't expensive, but thread jumps to busy threads already doing work are very expensive. We eventually reproduced these blockages locally by sprinkling Thread.sleep() calls at the right moments, and we managed to fix them by:
Together, removing these thread blockage issues reduced the startup time by over 25%.
Production metrics also challenged some of our prior assumptions. For example, we used to pre-load many JavaScript modules on the startup path under the assumption that co-locating modules in one bundle would reduce their initialization cost. However, the cost of pre-loading and co-locating these modules far outweighed the benefits. By re-configuring our inline require blacklists and removing JavaScript modules from the startup path, we were able to avoid loading unnecessary modules such as Relay Classic (when only Relay Modern was necessary). Today, our RUN_JS_BUNDLE breakdown is over 75% faster.
We also found wins by investigating product-specific native modules. For example, by lazily injecting a native module's dependencies, we reduced that native module's cost by 98%. By removing the contention of Marketplace startup with other products, we reduced startup by an equivalent interval.
The best part is that many of these improvements are broadly applicable to all screens built with React Native.
People assume that React Native startup performance problems are caused by JavaScript being slow or exceedingly high network times. While speeding up things like JavaScript would bring down TTI by a non-trivial sum, each of these contribute a much smaller percentage of TTI than was previously believed.
The lesson so far has been to measure, measure, measure! Some wins come from moving run-time costs to build time, such as Relay Modern and Lazy NativeModules. Other wins come from avoiding work by being smarter about parallelizing code or removing dead code. And some wins come from large architectural changes to React Native, such as cleaning up thread blockages. There is no grand solution to performance, and longer-term performance wins will come from incremental instrumentation and improvements. Do not let cognitive bias influence your decisions. Instead, carefully gather and interpret production data to guide future work.
In the long term, we want Marketplace TTI to be comparable to similar products built with Native, and, in general, have React Native performance on par with native performance. Further more, although this half we drastically reduced the bridge startup cost by about 80%, we plan to bring the cost of the React Native bridge close to zero via projects like Prepack and more build time processing.
The React Native monthly meeting continues! On this session, we were joined by Infinite Red, great minds behind Chain React, the React Native Conference. As most of the people here were presenting talks at Chain React, we pushed the meeting to a week later. Talks from the conference have been posted online and I encourage you to check them out. So, let's see what our teams are up to.
On this second meeting, we had 9 teams join us:
Here are the notes from each team:
react-native-gesture-handler), GL camera integration and hoping to land some of these for the first time in SDK20 (August), and significant improvements to others by then as well. We're just getting started on building infrastructure into the Expo client for background work (geolocation, audio, handling notifications, etc.).MaskedViewIOS which he upstreamed. If you have the skills and desire to implement MaskedView for Android that would be awesome!react-native commands when developing apps on Shoutem.The next session is scheduled for August 16, 2017. As this was only our second meeting, we'd like to know how do these notes benefit the React Native community. Feel free to ping me on Twitter if you have any suggestion on how we should improve the output of the meeting.
At Shoutem, we've been fortunate enough to work with React Native from its very beginnings. We decided we wanted to be part of the amazing community from day one. Soon enough, we realized it's almost impossible to keep up with the pace the community was growing and improving. That's why we decided to organize a monthly meeting where all major React Native contributors can briefly present what their efforts and plans are.
We had our first session of the monthly meeting on June 14, 2017. The mission for React Native Monthly is simple and straightforward: improve the React Native community. Presenting teams' efforts eases collaboration between teams done offline.
On the first meeting, we had 8 teams join us:
We hope to have more core contributors join the upcoming sessions!
As teams' plans might be of interest to a broader audience, we'll be sharing them here, on the React Native blog. So, here they are:
View and the AccessibilityInfo native module..js files. Right now, it supports only React Native. It’s similar to Adobe XD and Sketch.Meetings will be held every four weeks. The next session is scheduled for July 12, 2017. As we just started with this meeting, we'd like to know how do these notes benefit the React Native community. Feel free to ping me on Twitter if you have any suggestion on what we should cover in the following sessions, or how we should improve the output of the meeting.

Many of you have started playing with some of our new List components already after our teaser announcement in the community group, but we are officially announcing them today! No more ListViews or DataSources, stale rows, ignored bugs, or excessive memory consumption - with the latest React Native March 2017 release candidate (0.43-rc.1) you can pick from the new suite of components what best fits your use-case, with great perf and feature sets out of the box:
<FlatList>This is the workhorse component for simple, performant lists. Provide an array of data and a renderItem function and you're good to go:
<FlatList
  data={[{title: 'Title Text', key: 'item1'}, ...]}
  renderItem={({item}) => <ListItem title={item.title} />}
/>
<SectionList>If you want to render a set of data broken into logical sections, maybe with section headers (e.g. in an alphabetical address book), and potentially with heterogeneous data and rendering (such as a profile view with some buttons followed by a composer, then a photo grid, then a friend grid, and finally a list of stories), this is the way to go.
<SectionList
  renderItem={({item}) => <ListItem title={item.title} />}
  renderSectionHeader={({section}) => <H1 title={section.key} />}
  sections={[ // homogeneous rendering between sections
    {data: [...], key: ...},
    {data: [...], key: ...},
    {data: [...], key: ...},
  ]}
/>

<SectionList
  sections={[ // heterogeneous rendering between sections
    {data: [...], key: ..., renderItem: ...},
    {data: [...], key: ..., renderItem: ...},
    {data: [...], key: ..., renderItem: ...},
  ]}
/>
<VirtualizedList>The implementation behind the scenes with a more flexible API. Especially handy if your data is not in a plain array (e.g. an immutable list).
Lists are used in many contexts, so we packed the new components full of features to handle the majority of use cases out of the box:
onEndReached).onRefresh / refreshing).onViewableItemsChanged / viewabilityConfig).horizontal).numColumns)scrollToEnd, scrollToIndex, and scrollToItemThe internal state of item subtrees is not preserved when content scrolls out of the render window. Make sure all your data is captured in the item data or external stores like Flux, Redux, or Relay.
These components are based on PureComponent which means that they will not re-render if props remains shallow-equal. Make sure that everything your renderItem function depends on directly is passed as a prop that is not === after updates, otherwise your UI may not update on changes. This includes the data prop and parent component state. For example:
<FlatList
  data={this.state.data}
  renderItem={({ item }) => (
    <MyItem
      item={item}
      onPress={() =>
        this.setState((oldState) => ({
          selected: {
            // New instance breaks `===`
            ...oldState.selected, // copy old data
            [item.key]: !oldState.selected[item.key] // toggle
          }
        }))
      }
      selected={
        !!this.state.selected[item.key] // renderItem depends on state
      }
    />
  )}
  selected={
    // Can be any prop that doesn't collide with existing props
    this.state.selected // A change to selected should re-render FlatList
  }
/>
In order to constrain memory and enable smooth scrolling, content is rendered asynchronously offscreen. This means it's possible to scroll faster than the fill rate and momentarily see blank content. This is a tradeoff that can be adjusted to suit the needs of each application, and we are working on improving it behind the scenes.
By default, these new lists look for a key prop on each item and use that for the React key. Alternatively, you can provide a custom keyExtractor prop.
Besides simplifying the API, the new list components also have significant performance enhancements, the main one being nearly constant memory usage for any number of rows. This is done by 'virtualizing' elements that are outside of the render window by completely unmounting them from the component hierarchy and reclaiming the JS memory from the react components, along with the native memory from the shadow tree and the UI views. This has a catch which is that internal component state will not be preserved, so make sure you track any important state outside of the components themselves, e.g. in Relay or Redux or Flux store.
Limiting the render window also reduces the amount of work that needs to be done by React and the native platform, e.g from view traversals. Even if you are rendering the last of a million elements, with these new lists there is no need to iterate through all those elements in order to render. You can even jump to the middle with scrollToIndex without excessive rendering.
We've also made some improvements with scheduling which should help with application responsiveness. Items at the edge of the render window are rendered infrequently and at a lower priority after any active gestures or animations or other interactions have completed.
Unlike ListView, all items in the render window are re-rendered any time any props change. Often this is fine because the windowing reduces the number of items to a constant number, but if your items are on the complex side, you should make sure to follow React best practices for performance and use React.PureComponent and/or shouldComponentUpdate as appropriate within your components to limit re-renders of the recursive subtree.
If you can calculate the height of your rows without rendering them, you can improve the user experience by providing the getItemLayout prop. This makes it much smoother to scroll to specific items with e.g. scrollToIndex, and will improve the scroll indicator UI because the height of the content can be determined without rendering it.
If you have an alternative data type, like an immutable list, <VirtualizedList> is the way to go. It takes a getItem prop that lets you return the item data for any given index and has looser flow typing.
There are also a bunch of parameters you can tweak if you have an unusual use case. For example, you can use windowSize to trade off memory usage vs. user experience, maxToRenderPerBatch to adjust fill rate vs. responsiveness, onEndReachedThreshold to control when scroll loading happens, and more.
ListView).
At Facebook, we often need to access deeply nested values in data structures fetched with GraphQL. On the way to accessing these deeply nested values, it is common for one or more intermediate fields to be nullable. These intermediate fields may be null for a variety of reasons, from failed privacy checks to the mere fact that null happens to be the most flexible way to represent non-fatal errors.
Unfortunately, accessing these deeply nested values is currently tedious and verbose.
props.user &&
  props.user.friends &&
  props.user.friends[0] &&
  props.user.friends[0].friends;
There is an ECMAScript proposal to introduce the existential operator which will make this much more convenient. But until a time when that proposal is finalized, we want a solution that improves our quality of life, maintains existing language semantics, and encourages type safety with Flow.
We came up with an existential function we call idx.
idx(props, (_) => _.user.friends[0].friends);
The invocation in this code snippet behaves similarly to the boolean expression in the code snippet above, except with significantly less repetition. The idx function takes exactly two arguments:
In theory, the idx function will try-catch errors that are the result of accessing properties on null or undefined. If such an error is caught, it will return either null or undefined. (And you can see how this might be implemented in idx.js.)
In practice, try-catching every nested property access is slow, and differentiating between specific kinds of TypeErrors is fragile. To deal with these shortcomings, we created a Babel plugin that transforms the above idx invocation into the following expression:
props.user == null
  ? props.user
  : props.user.friends == null
  ? props.user.friends
  : props.user.friends[0] == null
  ? props.user.friends[0]
  : props.user.friends[0].friends;
Finally, we added a custom Flow type declaration for idx that allows the traversal in the second argument to be properly type-checked while permitting nested access on nullable properties.
The function, Babel plugin, and Flow declaration are now available on GitHub. They are used by installing the idx and babel-plugin-idx npm packages, and adding “idx” to the list of plugins in your .babelrc file.

Today we’re announcing Create React Native App: a new tool that makes it significantly easier to get started with a React Native project! It’s heavily inspired by the design of Create React App and is the product of a collaboration between Facebook and Expo (formerly Exponent).
Many developers struggle with installing and configuring React Native’s current native build dependencies, especially for Android. With Create React Native App, there’s no need to use Xcode or Android Studio, and you can develop for your iOS device using Linux or Windows. This is accomplished using the Expo app, which loads and runs CRNA projects written in pure JavaScript without compiling any native code.
Try creating a new project (replace with suitable yarn commands if you have it installed):
$ npm i -g create-react-native-app
$ create-react-native-app my-project
$ cd my-project
$ npm start
This will start the React Native packager and print a QR code. Open it in the Expo app to load your JavaScript. Calls to console.log are forwarded to your terminal. You can make use of any standard React Native APIs as well as the Expo SDK.
Many React Native projects have Java or Objective-C/Swift dependencies that need to be compiled. The Expo app does include APIs for camera, video, contacts, and more, and bundles popular libraries like Airbnb’s react-native-maps, or Facebook authentication. However if you need a native code dependency that Expo doesn’t bundle then you’ll probably need to have your own build configuration for it. Just like Create React App, “ejecting” is supported by CRNA.
You can run npm run eject to get a project very similar to what react-native init would generate. At that point you’ll need Xcode and/or Android Studio just as you would if you started with react-native init , adding libraries with react-native link will work, and you’ll have full control over the native code compilation process.
Create React Native App is now stable enough for general use, which means we’re very eager to hear about your experience using it! You can find me on Twitter or open an issue on the GitHub repository. Pull requests are very welcome!

For the past year, we've been working on improving performance of animations that use the Animated library. Animations are very important to create a beautiful user experience but can also be hard to do right. We want to make it easy for developers to create performant animations without having to worry about some of their code causing it to lag.
The Animated API was designed with a very important constraint in mind, it is serializable. This means we can send everything about the animation to native before it has even started and allows native code to perform the animation on the UI thread without having to go through the bridge on every frame. It is very useful because once the animation has started, the JS thread can be blocked and the animation will still run smoothly. In practice this can happen a lot because user code runs on the JS thread and React renders can also lock JS for a long time.
This project started about a year ago, when Expo built the li.st app on Android. Krzysztof Magiera was contracted to build the initial implementation on Android. It ended up working well and li.st was the first app to ship with native driven animations using Animated. A few months later, Brandon Withrow built the initial implementation on iOS. After that, Ryan Gomba and myself worked on adding missing features like support for Animated.event as well as squash bugs we found when using it in production apps. This was truly a community effort and I would like to thanks everyone that was involved as well as Expo for sponsoring a large part of the development. It is now used by Touchable components in React Native as well as for navigation animations in the newly released React Navigation library.
First, let's check out how animations currently work using Animated with the JS driver. When using Animated, you declare a graph of nodes that represent the animations that you want to perform, and then use a driver to update an Animated value using a predefined curve. You may also update an Animated value by connecting it to an event of a View using Animated.event.
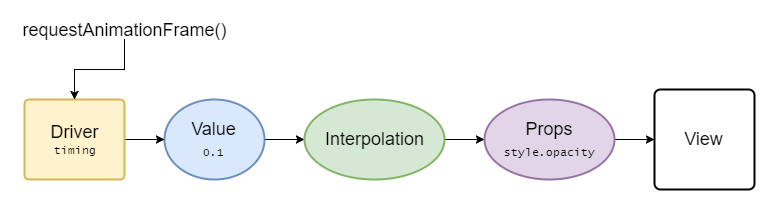
Here's a breakdown of the steps for an animation and where it happens:
requestAnimationFrame to execute on every frame and update the value it drives using the new value it calculates based on the animation curve.View.View is updated using setNativeProps.UIView or android.View is updated.As you can see, most of the work happens on the JS thread. If it is blocked the animation will skip frames. It also needs to go through the JS to Native bridge on every frame to update native views.
What the native driver does is move all of these steps to native. Since Animated produces a graph of animated nodes, it can be serialized and sent to native only once when the animation starts, eliminating the need to callback into the JS thread; the native code can take care of updating the views directly on the UI thread on every frame.
Here's an example of how we can serialize an animated value and an interpolation node (not the exact implementation, just an example).
Create the native value node, this is the value that will be animated:
NativeAnimatedModule.createNode({
  id: 1,
  type: 'value',
  initialValue: 0,
});
Create the native interpolation node, this tells the native driver how to interpolate a value:
NativeAnimatedModule.createNode({
  id: 2,
  type: 'interpolation',
  inputRange: [0, 10],
  outputRange: [10, 0],
  extrapolate: 'clamp',
});
Create the native props node, this tells the native driver which prop on the view it is attached to:
NativeAnimatedModule.createNode({
  id: 3,
  type: 'props',
  properties: ['style.opacity'],
});
Connect nodes together:
NativeAnimatedModule.connectNodes(1, 2);
NativeAnimatedModule.connectNodes(2, 3);
Connect the props node to a view:
NativeAnimatedModule.connectToView(3, ReactNative.findNodeHandle(viewRef));
With that, the native animated module has all the info it needs to update the native views directly without having to go to JS to calculate any value.
All there is left to do is actually start the animation by specifying what type of animation curve we want and what animated value to update. Timing animations can also be simplified by calculating every frame of the animation in advance in JS to make the native implementation smaller.
NativeAnimatedModule.startAnimation({
  type: 'timing',
  frames: [0, 0.1, 0.2, 0.4, 0.65, ...],
  animatedValueId: 1,
});
And now here's the breakdown of what happens when the animation runs:
CADisplayLink or android.view.Choreographer to execute on every frame and update the value it drives using the new value it calculates based on the animation curve.UIView or android.View is updated.As you can see, no more JS thread and no more bridge which means faster animations! 🎉🎉
For normal animations the answer is simple, just add useNativeDriver: true to the animation config when starting it.
Before:
Animated.timing(this.state.animatedValue, {
  toValue: 1,
  duration: 500,
}).start();
After:
Animated.timing(this.state.animatedValue, {
  toValue: 1,
  duration: 500,
  useNativeDriver: true, // <-- Add this
}).start();
Animated values are only compatible with one driver so if you use native driver when starting an animation on a value, make sure every animation on that value also uses the native driver.
It also works with Animated.event, this is very useful if you have an animation that must follow the scroll position because without the native driver it will always run a frame behind of the gesture because of the async nature of React Native.
Before:
<ScrollView
  scrollEventThrottle={16}
  onScroll={Animated.event(
    [{ nativeEvent: { contentOffset: { y: this.state.animatedValue } } }]
  )}
>
  {content}
</ScrollView>
After:
<Animated.ScrollView // <-- Use the Animated ScrollView wrapper
  scrollEventThrottle={1} // <-- Use 1 here to make sure no events are ever missed
  onScroll={Animated.event(
    [{ nativeEvent: { contentOffset: { y: this.state.animatedValue } } }],
    { useNativeDriver: true } // <-- Add this
  )}
>
  {content}
</Animated.ScrollView>
Not everything you can do with Animated is currently supported in Native Animated. The main limitation is that you can only animate non-layout properties, things like transform and opacity will work but Flexbox and position properties won't. Another one is with Animated.event, it will only work with direct events and not bubbling events. This means it does not work with PanResponder but does work with things like ScrollView#onScroll.
Native Animated has also been part of React Native for quite a while but has never been documented because it was considered experimental. Because of that make sure you are using a recent version (0.40+) of React Native if you want to use this feature.
For more information about animated I recommend watching this talk by Christopher Chedeau.
If you want a deep dive into animations and how offloading them to native can improve user experience there is also this talk by Krzysztof Magiera.

After launching an app to the app stores, internationalization is the next step to further your audience reach. Over 20 countries and numerous people around the world use Right-to-Left (RTL) languages. Thus, making your app support RTL for them is necessary.
We're glad to announce that React Native has been improved to support RTL layouts. This is now available in the react-native master branch today, and will be available in the next RC: v0.33.0-rc.
This involved changing css-layout, the core layout engine used by RN, and RN core implementation, as well as specific OSS JS components to support RTL.
To battle test the RTL support in production, the latest version of the Facebook Ads Manager app (the first cross-platform 100% RN app) is now available in Arabic and Hebrew with RTL layouts for both iOS and Android. Here is how it looks like in those RTL languages:


css-layout already has a concept of start and end for the layout. In the Left-to-Right (LTR) layout, start means left, and end means right. But in RTL, start means right, and end means left. This means we can make RN depend on the start and end calculation to compute the correct layout, which includes position, padding, and margin.
In addition, css-layout already makes each component's direction inherits from its parent. This means, we simply need to set the direction of the root component to RTL, and the entire app will flip.
The diagram below describes the changes at high level:

These include:
left and right to start and end in RN core implementation for shadow nodesWith this update, when you allow RTL layout for your app:
To support RTL, you should first add the RTL language bundles to your app.
Allow RTL layout for your app by calling the allowRTL() function at the beginning of native code. We provided this utility to only apply to an RTL layout when your app is ready. Here is an example:
iOS:
// in AppDelegate.m
        [[RCTI18nUtil sharedInstance] allowRTL:YES];
Android:
// in MainActivity.java
        I18nUtil sharedI18nUtilInstance = I18nUtil.getInstance();
        sharedI18nUtilInstance.allowRTL(context, true);
For Android, you need add android:supportsRtl="true" to the <application> element in AndroidManifest.xml file.
Now, when you recompile your app and change the device language to an RTL language (e.g. Arabic or Hebrew), your app layout should change to RTL automatically.
In general, most components are already RTL-ready, for example:

However, there are several cases to be aware of, for which you will need the I18nManager. In I18nManager, there is a constant isRTL to tell if layout of app is RTL or not, so that you can make the necessary changes according to the layout.
If your component has icons or images, they will be displayed the same way in LTR and RTL layout, because RN will not flip your source image. Therefore, you should flip them according to the layout style.
Here are two ways to flip the icon according to the direction:
Adding a transform style to the image component:
<Image
  source={...}
  style={{transform: [{scaleX: I18nManager.isRTL ? -1 : 1}]}}
/>
Or, changing the image source according to the direction:
let imageSource = require('./back.png');
if (I18nManager.isRTL) {
  imageSource = require('./forward.png');
}
return <Image source={imageSource} />;
In Android and iOS development, when you change to RTL layout, the gestures and animations are the opposite of LTR layout. Currently, in RN, gestures and animations are not supported on RN core code level, but on components level. The good news is, some of these components already support RTL today, such as SwipeableRow and NavigationExperimental. However, other components with gestures will need to support RTL manually.
A good example to illustrate gesture RTL support is SwipeableRow.

// SwipeableRow.js
_isSwipingExcessivelyRightFromClosedPosition(gestureState: Object): boolean {
  // ...
  const gestureStateDx = IS_RTL ? -gestureState.dx : gestureState.dx;
  return (
    this._isSwipingRightFromClosed(gestureState) &&
    gestureStateDx > RIGHT_SWIPE_THRESHOLD
  );
},
// SwipeableRow.js
_animateBounceBack(duration: number): void {
  // ...
  const swipeBounceBackDistance = IS_RTL ?
    -RIGHT_SWIPE_BOUNCE_BACK_DISTANCE :
    RIGHT_SWIPE_BOUNCE_BACK_DISTANCE;
  this._animateTo(
    -swipeBounceBackDistance,
    duration,
    this._animateToClosedPositionDuringBounce,
  );
},
Even after the initial RTL-compatible app release, you will likely need to iterate on new features. To improve development efficiency, I18nManager provides the forceRTL() function for faster RTL testing without changing the test device language. You might want to provide a simple switch for this in your app. Here's an example from the RTL example in the RNTester:
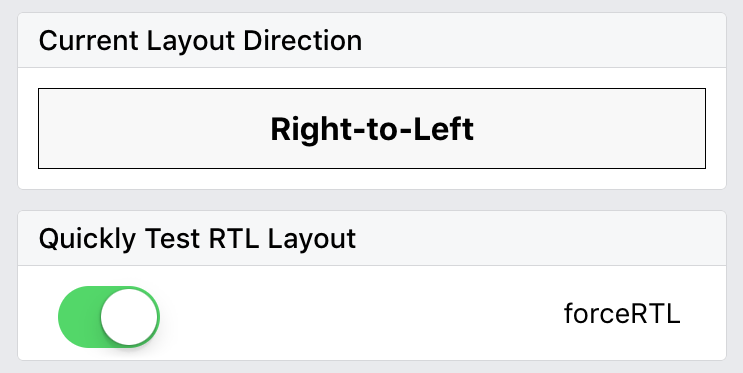
<RNTesterBlock title={'Quickly Test RTL Layout'}>
  <View style={styles.flexDirectionRow}>
    <Text style={styles.switchRowTextView}>forceRTL</Text>
    <View style={styles.switchRowSwitchView}>
      <Switch
        onValueChange={this._onDirectionChange}
        style={styles.rightAlignStyle}
        value={this.state.isRTL}
      />
    </View>
  </View>
</RNTesterBlock>;

_onDirectionChange = () => {
  I18nManager.forceRTL(!this.state.isRTL);
  this.setState({ isRTL: !this.state.isRTL });
  Alert.alert(
    'Reload this page',
    'Please reload this page to change the UI direction! ' +
      'All examples in this app will be affected. ' +
      'Check them out to see what they look like in RTL layout.'
  );
};
When working on a new feature, you can easily toggle this button and reload the app to see RTL layout. The benefit is you won't need to change the language setting to test, however some text alignment won't change, as explained in the next section. Therefore, it's always a good idea to test your app in the RTL language before launching.
The RTL support should cover most of the UX in your app; however, there are some limitations for now:
There is no "true" left/right
As discussed before, we map the left/right styles from the JS side to start/end, all left in code for RTL layout becomes "right" on screen, and right in code becomes "left" on screen. This is convenient because you don't need to change your product code too much, but it means there is no way to specify "true left" or "true right" in the code. In the future, allowing a component to control its direction regardless of the language may be necessary.
Make RTL support for gestures and animations more developer friendly
Currently, there is still some programming effort required to make gestures and animations RTL compatible. In the future, it would be ideal to find a way to make gestures and animations RTL support more developer friendly.
Check out the RTLExample in the RNTester to understand more about RTL support, and let us know how it works for you!
Finally, thank you for reading! We hope that the RTL support for React Native helps you grow your apps for international audience!

React Native allows you to build Android and iOS apps in JavaScript using React and Relay's declarative programming model. This leads to more concise, easier-to-understand code; fast iteration without a compile cycle; and easy sharing of code across multiple platforms. You can ship faster and focus on details that really matter, making your app look and feel fantastic. Optimizing performance is a big part of this. Here is the story of how we made React Native app startup twice as fast.
With an app that runs faster, content loads quickly, which means people get more time to interact with it, and smooth animations make the app enjoyable to use. In emerging markets, where 2011 class phones on 2G networks are the majority, a focus on performance can make the difference between an app that is usable and one that isn't.
Since releasing React Native on iOS and on Android, we have been improving list view scrolling performance, memory efficiency, UI responsiveness, and app startup time. Startup sets the first impression of an app and stresses all parts of the framework, so it is the most rewarding and challenging problem to tackle.
This is an excerpt. Read the rest of the post on Facebook Code.

React Native's goal is to give you the best possible developer experience. A big part of it is the time it takes between you save a file and be able to see the changes. Our goal is to get this feedback loop to be under 1 second, even as your app grows.
We got close to this ideal via three main features:
At this point, the bottleneck for developers is no longer the time it takes to reload the app but losing the state of your app. A common scenario is to work on a feature that is multiple screens away from the launch screen. Every time you reload, you've got to click on the same path again and again to get back to your feature, making the cycle multiple-seconds long.
The idea behind hot reloading is to keep the app running and to inject new versions of the files that you edited at runtime. This way, you don't lose any of your state which is especially useful if you are tweaking the UI.
A video is worth a thousand words. Check out the difference between Live Reload (current) and Hot Reload (new).
If you look closely, you can notice that it is possible to recover from a red box and you can also start importing modules that were not previously there without having to do a full reload.
Word of warning: because JavaScript is a very stateful language, hot reloading cannot be perfectly implemented. In practice, we found out that the current setup is working well for a large amount of usual use cases and a full reload is always available in case something gets messed up.
Hot reloading is available as of 0.22, you can enable it:
Now that we've seen why we want it and how to use it, the fun part begins: how it actually works.
Hot Reloading is built on top of a feature Hot Module Replacement, or HMR. It was first introduced by Webpack and we implemented it inside of React Native Packager. HMR makes the Packager watch for file changes and send HMR updates to a thin HMR runtime included on the app.
In a nutshell, the HMR update contains the new code of the JS modules that changed. When the runtime receives them, it replaces the old modules' code with the new one:

The HMR update contains a bit more than just the module's code we want to change because replacing it, it's not enough for the runtime to pick up the changes. The problem is that the module system may have already cached the exports of the module we want to update. For instance, say you have an app composed of these two modules:
// log.js
function log(message) {
  const time = require('./time');
  console.log(`[${time()}] ${message}`);
}

module.exports = log;
// time.js
function time() {
  return new Date().getTime();
}

module.exports = time;
The module log, prints out the provided message including the current date provided by the module time.
When the app is bundled, React Native registers each module on the module system using the __d function. For this app, among many __d definitions, there will one for log:
__d('log', function() {
  ... // module's code
});
This invocation wraps each module's code into an anonymous function which we generally refer to as the factory function. The module system runtime keeps track of each module's factory function, whether it has already been executed, and the result of such execution (exports). When a module is required, the module system either provides the already cached exports or executes the module's factory function for the first time and saves the result.
So say you start your app and require log. At this point, neither log nor time's factory functions have been executed so no exports have been cached. Then, the user modifies time to return the date in MM/DD:
// time.js
function bar() {
  var date = new Date();
  return `${date.getMonth() + 1}/${date.getDate()}`;
}

module.exports = bar;
The Packager will send time's new code to the runtime (step 1), and when log gets eventually required the exported function gets executed it will do so with time's changes (step 2):

Now say the code of log requires time as a top level require:
const time = require('./time'); // top level require

// log.js
function log(message) {
  console.log(`[${time()}] ${message}`);
}

module.exports = log;
When log is required, the runtime will cache its exports and time's one. (step 1). Then, when time is modified, the HMR process cannot simply finish after replacing time's code. If it did, when log gets executed, it would do so with a cached copy of time (old code).
For log to pick up time changes, we'll need to clear its cached exports because one of the modules it depends on was hot swapped (step 3). Finally, when log gets required again, its factory function will get executed requiring time and getting its new code.
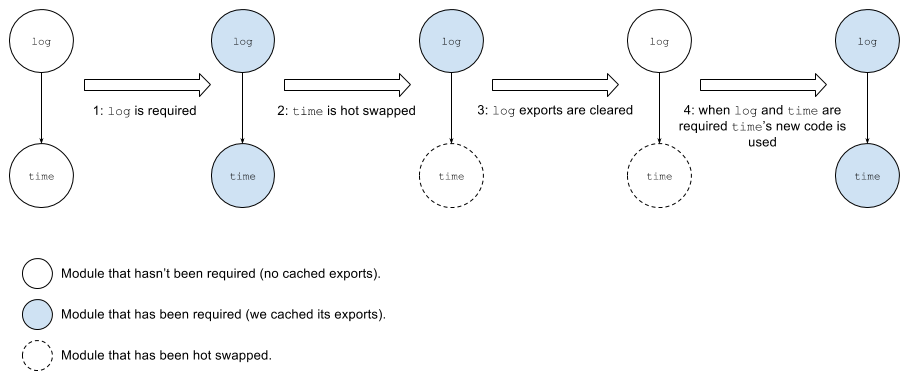
HMR in React Native extends the module system by introducing the hot object. This API is based on Webpack's one. The hot object exposes a function called accept which allows you to define a callback that will be executed when the module needs to be hot swapped. For instance, if we would change time's code as follows, every time we save time, we'll see “time changed” in the console:
// time.js
function time() {
  ... // new code
}

module.hot.accept(() => {
  console.log('time changed');
});

module.exports = time;
Note that only in rare cases you would need to use this API manually. Hot Reloading should work out of the box for the most common use cases.
As we've seen before, sometimes it's not enough only accepting the HMR update because a module that uses the one being hot swapped may have been already executed and its imports cached. For instance, suppose the dependency tree for the movies app example had a top-level MovieRouter that depended on the MovieSearch and MovieScreen views, which depended on the log and time modules from the previous examples:
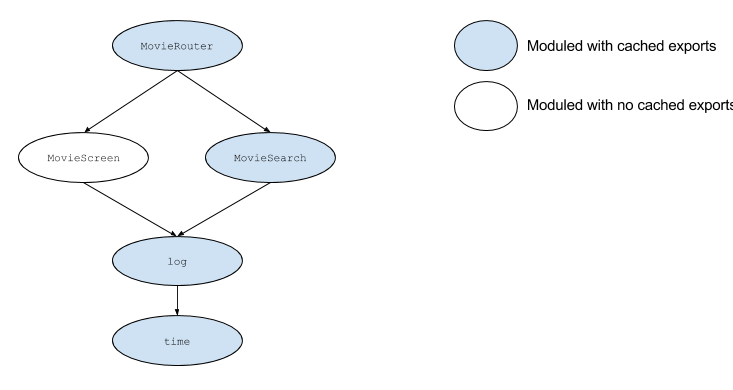
If the user accesses the movies' search view but not the other one, all the modules except for MovieScreen would have cached exports. If a change is made to module time, the runtime will have to clear the exports of log for it to pick up time's changes. The process wouldn't finish there: the runtime will repeat this process recursively up until all the parents have been accepted. So, it'll grab the modules that depend on log and try to accept them. For MovieScreen it can bail, as it hasn't been required yet. For MovieSearch, it will have to clear its exports and process its parents recursively. Finally, it will do the same thing for MovieRouter and finish there as no modules depends on it.
In order to walk the dependency tree, the runtime receives the inverse dependency tree from the Packager on the HMR update. For this example the runtime will receive a JSON object like this one:
{
  modules: [
    {
      name: 'time',
      code: /* time's new code */
    }
  ],
  inverseDependencies: {
    MovieRouter: [],
    MovieScreen: ['MovieRouter'],
    MovieSearch: ['MovieRouter'],
    log: ['MovieScreen', 'MovieSearch'],
    time: ['log'],
  }
}
React components are a bit harder to get to work with Hot Reloading. The problem is that we can't simply replace the old code with the new one as we'd loose the component's state. For React web applications, Dan Abramov implemented a babel transform that uses Webpack's HMR API to solve this issue. In a nutshell, his solution works by creating a proxy for every single React component on transform time. The proxies hold the component's state and delegate the lifecycle methods to the actual components, which are the ones we hot reload:

Besides creating the proxy component, the transform also defines the accept function with a piece of code to force React to re-render the component. This way, we can hot reload rendering code without losing any of the app's state.
The default transformer that comes with React Native uses the babel-preset-react-native, which is configured to use react-transform the same way you'd use it on a React web project that uses Webpack.
To enable Hot Reloading on Redux stores you will just need to use the HMR API similarly to what you'd do on a web project that uses Webpack:
// configureStore.js
import { createStore, applyMiddleware, compose } from 'redux';
import thunk from 'redux-thunk';
import reducer from '../reducers';

export default function configureStore(initialState) {
  const store = createStore(
    reducer,
    initialState,
    applyMiddleware(thunk),
  );

  if (module.hot) {
    module.hot.accept(() => {
      const nextRootReducer = require('../reducers/index').default;
      store.replaceReducer(nextRootReducer);
    });
  }

  return store;
};
When you change a reducer, the code to accept that reducer will be sent to the client. Then the client will realize that the reducer doesn't know how to accept itself, so it will look for all the modules that refer it and try to accept them. Eventually, the flow will get to the single store, the configureStore module, which will accept the HMR update.
If you are interested in helping making hot reloading better, I encourage you to read Dan Abramov's post around the future of hot reloading and to contribute. For example, Johny Days is going to make it work with multiple connected clients. We're relying on you all to maintain and improve this feature.
With React Native, we have the opportunity to rethink the way we build apps in order to make it a great developer experience. Hot reloading is only one piece of the puzzle, what other crazy hacks can we do to make it better?

With the recent launch of React on web and React Native on mobile, we've provided a new front-end framework for developers to build products. One key aspect of building a robust product is ensuring that anyone can use it, including people who have vision loss or other disabilities. The Accessibility API for React and React Native enables you to make any React-powered experience usable by someone who may use assistive technology, like a screen reader for the blind and visually impaired.
For this post, we're going to focus on React Native apps. We've designed the React Accessibility API to look and feel similar to the Android and iOS APIs. If you've developed accessible applications for Android, iOS, or the web before, you should feel comfortable with the framework and nomenclature of the React AX API. For instance, you can make a UI element accessible (therefore exposed to assistive technology) and use accessibilityLabel to provide a string description for the element:
<View accessible={true} accessibilityLabel=”This is simple view”>
Let's walk through a slightly more involved application of the React AX API by looking at one of Facebook's own React-powered products: the Ads Manager app.
This is an excerpt. Read the rest of the post on Facebook Code.